Walk into a good barber supply store and you can feel the collective memory of a thousand close shaves on the shelves. The tools look simple, yet the choices carry real consequences for your skin, your schedule, and your wallet. I’ve helped plenty of first timers build a starter kit and learn technique, and the same truths keep surfacing. Start with honest assessment, pick gear that forgives mistakes, and master the fundamentals before chasing glamour.
This is not about turning your bathroom into a barbershop overnight. It is about skipping the expensive missteps and building a routine that delivers comfort and consistency. If you can commit to eight or ten shaves with proper prep and a gentle hand, you can get to irritation free results regardless of your beard type. From edge to aftershave, here is how I would guide you if we were standing together in front of the display wall.
Know your terrain before you choose your tools
Before you buy anything, map your beard and learn your skin. Run clean fingers across your stubble after a day or two of growth. You will feel that some sections run north to south, others east to west, and a few areas swirl like a cowlick. That grain matters more than any product choice. Shaving with the grain during the first pass reduces tugging and lowers your risk of razor burn.
Skin type matters too. Oily or acne prone skin can tolerate a slightly more aggressive blade, provided your prep includes a proper cleanse and you avoid heavy, occlusive post shave products. Dry or sensitive skin craves cushion in the lather and a milder blade gap. If your neck flares up every time you shave, plan on two gentle passes rather than one forceful scrape.
Hair density affects everything from blade selection to lather hydration. Coarse beards drink water. Give them what they want. Softer beards need less bloom time, less product, and lighter pressure. When customers tell me they have a “tough beard,” I ask three questions: how long do you hydrate before the first stroke, how many days of growth are you cutting, and what blade are you pairing with your razor. Most of the time, better prep solves perceived toughness.
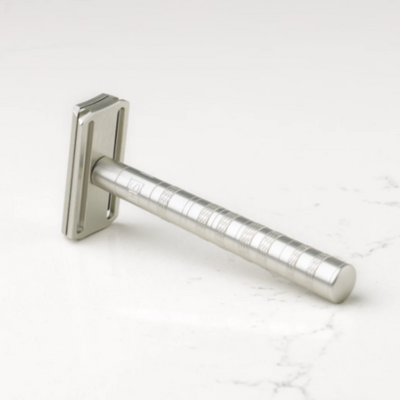
Choosing a razor you can actually learn on
A barber supply store stocks everything from single use disposables to heirloom straight razors. Each tool has a personality. Beginners do best with something that is intuitive, cheap to maintain, and hard to misuse.
Cartridge razors are familiar, but their pivoting heads and guarded blades mask technique errors. They can shave closely, yet they also tempt you into over shaving the same spot. For sensitive necks, that repeat scraping builds irritation. If you like the convenience and you are unwilling to learn angle discipline, a cartridge is fine. Just limit passes and respect the grain.
A disposable razor earns its space in the travel kit or gym bag. Quality varies wildly. Inexpensive disposables with two or three blades can be surprisingly kind if paired with slick lather and a light touch. The downside is inconsistency between batches and the environmental cost of tossing the entire unit. Still, a disposable razor is a useful benchmark. If you can get a calm, comfortable shave with a basic disposable, your prep and technique are sound.
Double edge safety razors strike the best balance for new shavers who want to improve. The head fixes the blade at a predictable angle, teaches pressure control, and lets you experiment with different blade brands for a few dollars. Maintenance is simple. Rinse, dry, replace the blade every five to eight shaves, and you are set. A mild to medium safety razor with a closed comb is the most forgiving route to clean cheeks and a calm neck.
Shavettes, the razors barbers use for lineups and neck work, hold a replaceable half double edge blade. They deliver straight razor precision without honing or stropping. For home shaving, they punish poor angle and excessive pressure. If you have a steady hand and patience, a shavette can be a great edging tool around a beard or goatee. I do not recommend it for full face beginners.
Traditional straight razors remain the romance item. When maintained well, they can be incredibly comfortable. They also demand stropping technique, occasional honing, and total focus. If you search for “straight razor Canada” you will see plenty of proud makers and specialty retailers offering blades that will last decades. For a newcomer who just wants daily comfort, I usually suggest postponing the straight until you have logged a few months with a safety razor or at least a reliable cartridge. You can still visit a shaving store to handle a few straights in person. The weight and balance teach you about blade control even if you are not buying yet.
What a practical beginner kit looks like
A first kit should be small, durable, and focused on building repeatable good habits. Skip the deluxe sets with ten products and a glass stand that belongs in a hotel lobby. You need a core that clears whiskers efficiently and soothes skin reliably. A barber supply store will help you assemble the following without fluff.
- A mild to medium double edge safety razor with a closed comb A sampler pack of double edge blades from different makers A quality synthetic shaving brush and a medium firmness cream or soap A pre shave cleanser, and a non alcohol witch hazel or light balm A pack of styptic matches or an alum block for rare nicks
Those five items, plus a towel and a mug or bowl you already own, will outperform a much pricier vanity set. If your budget is tight, trade the brush and soap for a brushless cream from a reputable shaving company and add the brush later.
Pre shave: the secret 70 percent
The first lesson I teach is that the shave begins before the blade touches your skin. Warm water softens the hair shaft and relaxes the outer cuticle, turning fence posts into noodles. Three minutes under a shower or a soaked towel achieves most of the softening you need. If you wash your face in the sink, use a mild cleanser that does not strip your skin barrier. Ingredients like glycerin and aloe add slip without heavy residue.
Beard conditioners and pre shave oils can help, but they are not mandatory. Oils, Browse around this site when misused, can block lather hydration. If you enjoy the ritual and your skin likes a drop of oil, keep it light. A better upgrade is a glycerin rich pre shave gel that rinses clean and leaves a tacky, hydrated base for your lather.
If you are shaving three days or more of growth, clip it down with trimmers first. Taking off the bulk reduces tugging and keeps your razor from clogging. A barber does this as second nature before a head shave or a heavy beard removal. Speed at the start usually means regret later.
Lather that works instead of lather that photographs well
Big, dry, meringue like lather looks impressive but shaves poorly. You want a glossy, yogurt like texture that clings to the skin and lets the blade glide without skipping. A quality cream is easier for beginners than a hard soap. Creams load quickly, hydrate easily, and tolerate imperfect water quality.
Synthetic brushes outperform animal hair for most novices. They dry faster, do not shed, and generate plenty of lather with less product. Badger and boar can be lovely, but they require break in and more care. If you do use a soap puck, give it a few teaspoons of warm water to bloom while you shower, then pour off the top before loading.
Work your lather in a bowl to learn product to water ratios, then finish with a brief paint and swirl on the face. Listen for the sound. Good lather dampens the scratch and replaces it with a soft hiss. If your razor skips or chatters, your lather is too dry or your angle is off.
Angle, pressure, pace: the technique that spares your skin
Safety razor marketing loves to talk about “let the weight of the razor do the work.” That advice is partly right. You should not press down. But blade feel varies by razor and blade combination, and your angle controls comfort as much as pressure. Aim to keep the cap just touching the skin and tilt the handle until the edge engages. On most faces that looks like a 30 degree approach, but do not hunt a number. Hunt consistency.
Short strokes work better than long swipes, especially around the chin and jaw. Rinse frequently. A clogged razor scrapes instead of cuts. Stretch the skin gently with your off hand on tricky curves. Think of flattening the surface rather than pulling it tight.
Here is a simple, durable sequence that suits most faces and avoids common pitfalls.
- First pass with the grain on the entire beard area Rinse, relather, and shave across the grain on cheeks and jaw only Rinse, relather lightly, and touch up visible stragglers without chasing total smoothness Cold water rinse, pat dry with a clean towel, and apply witch hazel or a light balm Leave fragrance heavy splashes for evenings, not rushed weekday mornings
That rhythm delivers a close, calm shave in 8 to 10 minutes once you get the hang of it. If your neck is sensitive, skip the across the grain step there for the first week. You can introduce it once your skin quiets down.
Blade selection without superstition
Walk into any shaving store or read a forum and you will hear opinions presented as gospel. The truth is simpler. Blade sharpness sits on a spectrum, and your skin, beard, and razor head design combine to create the experience. That is why the sampler pack matters. Start with three to five brands that range from mild to keen, use each for several shaves, and keep notes.
Change only one variable at a time. If you try a new blade, keep your soap, brush, and routine constant. Count shaves per blade. Most people will get four to six comfortable shaves from a quality double edge before performance drops off. Coarse beards and dehydrated prep shorten that window. If the first shave feels rough, the blade might be coated and needs a couple of strokes to settle in. Do not judge it on the first cheek alone.
For travel or emergencies, a solid disposable razor still earns respect. I keep a couple in my dopp kit along with a small tube of brushless cream from a dependable shaving company. They rescue tight travel schedules and unfamiliar bathrooms. The key remains the same: hydrate, light pressure, and no ego.
Aftershave choices that heal instead of sting
The moment after rinsing is where many beginners go wrong. They grab a high alcohol splash, enjoy the burn, and end up red and tight an hour later. Alcohol does sanitize minor nicks, but it also strips moisture and disrupts the barrier. If you like a classic barbershop scent, keep the splash for special occasions and cut it with a few drops of unscented balm in your palm before applying.
For daily use, witch hazel without added alcohol calms inflammation and reduces weepers. Look for formulas with aloe, allantoin, or panthenol. A light balm with hyaluronic acid or squalane seals in hydration without grease. Oily skin does not mean you skip moisturizers. It means you choose a fast absorbing one. Apply with clean hands, and resist the urge to rub hard. Your skin has had enough friction for the day.
If you get a persistent nick, styptic matches work fast. Press for a few seconds, let it dry, then rinse the residue before balm. An alum block can serve double duty as a post shave tonic, but it is more astringent. Use it sparingly, and always rinse it off after a minute to avoid dryness.
Cleaning and maintenance that protects the investment
Razors last when you respect water and time. After the shave, open the razor, rinse out soap and hair, and pat it dry. Do not store it in a steamy cabinet. Airflow prevents corrosion and mold. Every few weeks, a mild soap bath and an old toothbrush keep threads and crevices clean.
Brushes appreciate the same care. Rinse until the water runs clear, gently squeeze the knot, and flick out moisture. Let it dry bristles down or on its side. Stands look nice, but airflow matters more than gravity. Synthetic knots are especially forgiving here, which is part of why I recommend them first.
If the straight razor siren call grows louder, learn stropping from a pro before you touch a blade to leather. Many a good edge has been rolled by a well meaning beginner. A local barber supply store often hosts workshops or can point you to someone who teaches honing and stropping properly. Expect to invest time as well as money.
Dispose of used double edge blades safely. A simple blade bank or a metal can with a slit in the lid keeps edges contained. In many regions, you can tape the opening and recycle the entire can once full. Check your municipal guidance.
Buying smart: what to expect from shops and brands
A dedicated shaving store or barber supply store is worth a visit because you can handle razors, feel brush knots, and smell soaps without guessing. Staff tend to know which brands stand behind their products and which scents overwhelm a small bathroom. This is where you learn the difference between marketing claims and how a handle actually balances in your hand.
When considering a shaving company online, look for precise descriptions rather than vague superlatives. Good makers publish blade gap and exposure for safety razors, list full ingredient decks, and offer blade samplers. If you are in Canada and looking for a traditional blade, search terms like “straight razor Canada retailer” will surface shops that ship domestically, which cuts down on delays and potential customs snags. Be mindful of transport rules if you fly often. Safety razor blades cannot go in carry on luggage. Plan ahead with disposables or check a bag.
Price does not always track performance. Excellent double edge blades cost less than a dollar each in bulk. A mid priced synthetic brush can outperform an expensive badger for face feel and lather building. Spend where it affects your skin first: razor head design, reliable blades, and a good cream or soap. Scales, stands, and ornate handles can wait until you have a routine you trust.
Common beginner mistakes and how to fix them
Rushing ruins good prep. Skipping the minute it takes to hydrate your beard costs you five minutes of post shave irritation. If your schedule is tight, shave after a shower, not before, and keep your gear simple. A brushless cream and a mild razor can save the day.
Over buffing, the habit of going over the same spot repeatedly without relathering, creates instant razor burn. If you catch yourself doing it, stop, rinse, and add a thin film of lather before any touch up. Do not chase baby smooth cheeks during the first week. Heal first, then dial in closeness.
Angle drift happens, especially on the non dominant side. Check in by placing the razor cap flat on your cheek, then lowering the handle until you feel the blade whisper. That reset takes a second and saves your skin.
Product soup does not equal performance. Mixing pre shave oil, heavy soap, astringent splash, and a thick balm can confuse your skin barrier. Try a lean routine for a week: cleanse, hydrate, lather, shave, witch hazel, light balm. Once your skin calms, add one variable at a time if you want to experiment.
Finally, dull blades cause tugging and tiny weepers. If your first stroke feels rough and your prep was decent, swap the blade. The cost of a fresh edge is tiny compared to a day of inflamed skin.
A 30 day path to confident shaving
Structure makes progress visible. Give yourself a month to learn. During week one, focus on prep and a single with the grain pass. Aim for comfort, not closeness. Week two, add a gentle across the grain pass on cheeks only. Learn how your jawline curves under your fingers. Week three, introduce across the grain on the neck if it feels calm, or continue refining your angle and pressure. Week four, test a new blade brand if you are curious, and note the differences.
Keep notes in simple language. “Feather felt sharp, needed lighter touch, great on cheeks, a bit hot on neck” beats a ten point scoring system. Photos help if you want to track irritation spots. At the end of the month, you will have a routine grounded in your own face, not in hype.
When and how to step up
Once you can deliver a comfortable shave on demand, consider refining your kit. If you want a closer result with fewer passes, try a slightly more efficient safety razor head while keeping everything else constant. If you love ritual, explore soaps with tallow or milks that add cushion, or a boar brush that adds a scrubby face feel once broken in. If precision edging around a beard matters, a shavette with guarded blades can define lines cleanly without moving to a full straight razor.
If the pull of a traditional straight razor is strong, visit a retailer who can help you choose a blade width and grind that suit your hand size and beard type. Many shops in larger Canadian cities showcase local makers alongside international names. Balance enthusiasm with honesty about maintenance. If you live in a small apartment with little storage and tight mornings, wait until your routine and space allow for stropping and safe storage.
The payoff: consistency over drama
A close, calm shave should feel boring in the best way. It should fade into the background of your day. The gear that gets you there rarely announces itself with chrome and glass. It looks like a mild safety razor, a matched blade, a reliable cream, and a basic aftershave that leaves your skin happy an hour later.
What a barber supply store provides, beyond the shelves, is judgment. A sense of which combinations work together, how small adjustments change the outcome, and how to avoid the rabbit holes that empty wallets but do not improve faces. Start small. Practice deliberately. Build from success. Whether you return weekly for blades and soap or pop in once a year to handle a new handle, you will have earned the quiet confidence that comes from mastering a humble craft.